
Your first transcript does not need a complicated setup. Start with a short, clear audio or video file, upload it, then listen back and download a reviewed copy. If you do not own or belong to a workspace, it stays private automatically. This guide follows that complete journey in TranscribeAny, using a real transcription of a fictional team check-in.
The simple path: New Transcription → Upload File → Choose files → Start Transcription → Open → review and edit → Download. You can start with Free Unlimited; the basic workflow does not require a paid transcription option.
Make Your First Transcript
Have a short recording ready? Open New Transcription and follow along. You will be asked to sign in if needed.
Start TranscribingBefore you start
- Use an audio or video recording you have permission to process. MP3, WAV, M4A, MP4 and WEBM are examples shown in the upload area.
- Start with a short clip with clear speech. Keep your original file so you can compare it with the result.
- Sign in to your TranscribeAny account. Check the file and duration limits shown in your upload panel; they depend on your plan.
- For a first attempt, use the ordinary transcription settings. You do not need Medical transcription, key terms or Agent / customer roles.
Our example: a 25-second team check-in
We created a short recording with two synthetic voices and no real personal or customer details. One speaker opens a weekly check-in; the other reports that a welcome email is ready. They agree to review a help center article by Wednesday. We uploaded the file as team-check-in.mp3 with automatic language detection, ordinary speaker labels and audio cleanup off.
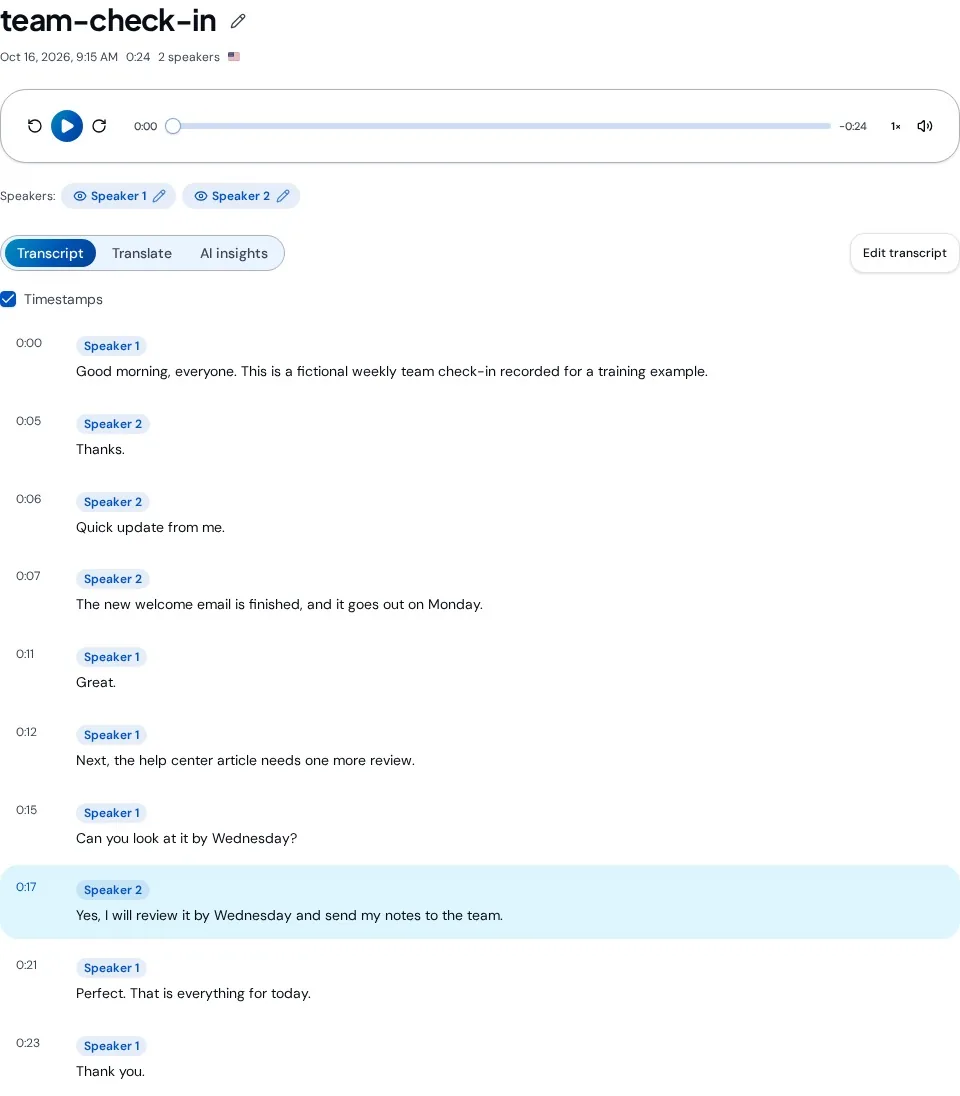
Example dialogue: “The new welcome email is finished, and it goes out on Monday.” “Next, the help center article needs one more review. Can you look at it by Wednesday?” “Yes, I will review it by Wednesday and send my notes to the team.”
The actual result detected English and two speakers. The screenshots below show that upload and transcript, not a mockup. A short, clear training clip is an example of the workflow, not a promise of accuracy or processing speed for every recording.
Step 1: Open New Transcription and choose Upload File
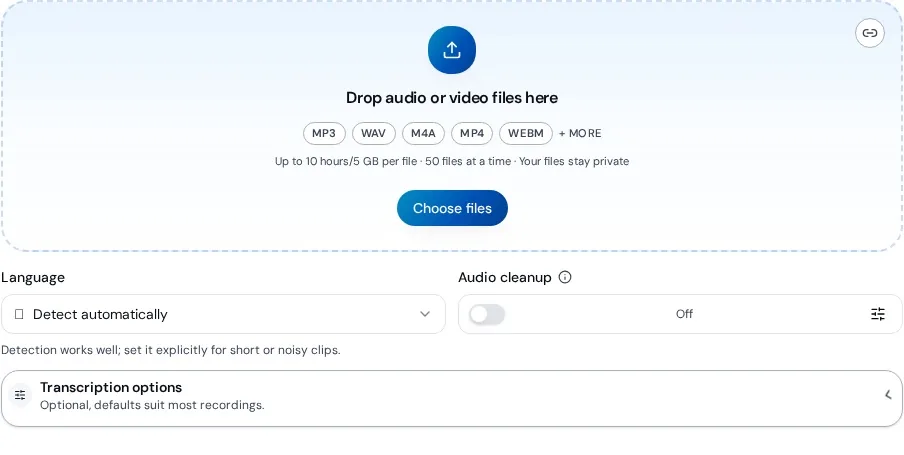
Select New Transcription in the app, then choose Upload File under Select A Transcription Method. This is the easiest first run when you already have a saved recording. Record Live is the alternative for capturing speech from your microphone; this walkthrough uses a file so you can replay the same source.

Step 2: Choose privacy and language
New users who do not own or belong to a workspace or team will not see Transcribe this for, Myself (private) or any workspace choices. Your recording stays private automatically, so go straight to Language. If you own or belong to a workspace, these choices appear: select Myself (private) for a personal recording, or a workspace only when its members should have access. Pick the destination before starting: a workspace recording goes into its shared library, while sharing a private recording afterwards is a separate action.
Set Language to the language spoken in your file, or keep Detect automatically if you are unsure. For very short or noisy clips, selecting the known language can help. We left detection automatic for this clear English example.
Audio cleanup is optional. It prepares uploaded audio on your device before sending it, so it adds preparation time. Leave it off for clean audio like ours. It can reduce rumble and balance volume, but it cannot restore speech that was never captured clearly. Leave Transcription options collapsed unless you have a specific need; ordinary defaults suit a basic first run.
Step 3: Add your file and select Start Transcription
Select Choose files and pick the recording, or drag it into the upload area. Check the filename in the queue before continuing. Adding a file stages it; transcription does not begin until you select Start Transcription.
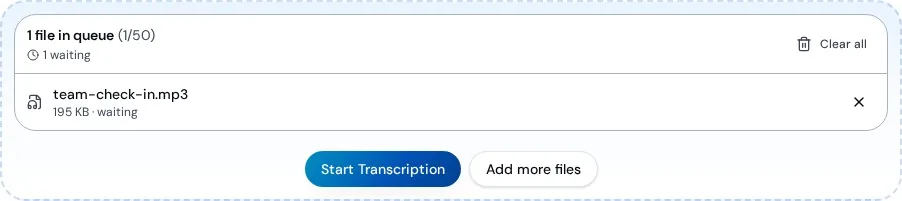
Keep the tab open while the file is being prepared and uploaded. Once it has uploaded and entered the queue, processing continues in the background. Wait for the recording to become Ready, then select Open. Your recent recordings show up on the New Transcription page, and All Recordings opens the full library.
Larger files, longer recordings, preparation and queue activity can take longer than this short example. If a run fails, read its message and check the audio and settings before retrying; do not assume repeated retries will improve an inaudible source.
Step 4: Listen back and check the text
The finished recording opens with an audio player above the transcript. Select Play to listen, pause when needed, and click a transcript line to jump to that moment. Use the timeline for another point in the recording and the speed control if you prefer slower or faster review.
- Check names, dates, numbers and promises against the audio; these details deserve more attention than perfect punctuation.
- Check that speaker changes make sense. The pencil beside a speaker label lets you rename it when you know who is speaking.
- Keep Timestamps on while reviewing timed lines. Turning them off presents flowing speaker paragraphs instead.
- The transcript viewing preference and Include timestamps in the download window are separate controls. Choose the download setting explicitly before exporting.
Step 5: Correct a word and save
Select Edit transcript to open the editing tools. Correct text directly, or use Find words… and Replace with… for a repeated spelling. Review a replacement before applying All, especially if a word occurs in different contexts. Select Save, then confirm Save changes when the confirmation appears.
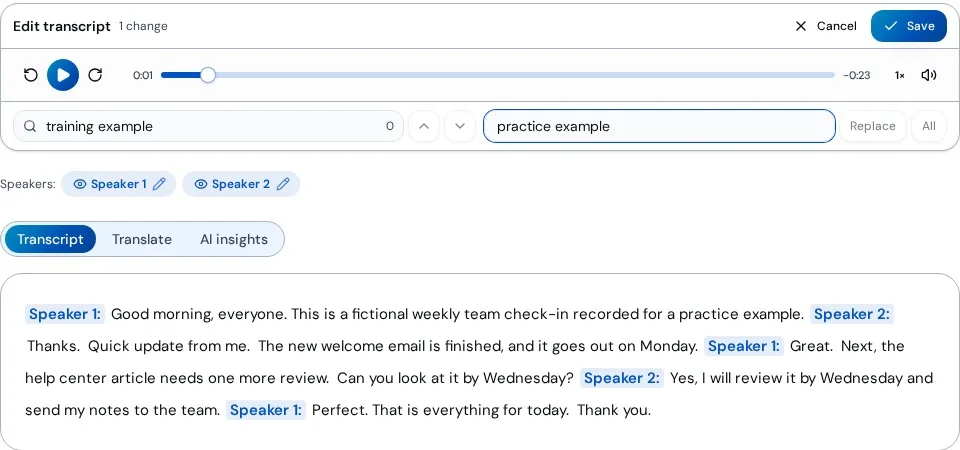
That demonstration deliberately changes the wording to show how saving works. For a verbatim transcript, preserve what the speaker actually said and limit corrections to transcription errors. If you do not want to keep your changes, use Cancel instead. Editing the text does not change the original spoken audio.
Step 6: Download a reviewed copy
Select the download icon in the recording’s top toolbar to open Download transcript. PDF is selected by default. Leave Include timestamps off for readable speaker paragraphs, or turn it on if the recipient needs recording times. Then select Download.
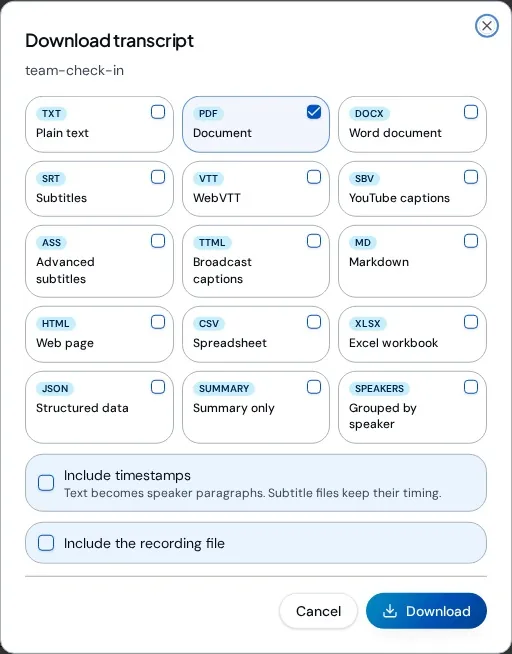
- PDF: a readable document for review or sending to someone.
- Word document: a DOCX file for further editing in a document editor.
- Plain text: simple text for notes and other tools.
- SRT or VTT: timed captions for video; subtitle formats keep timing even when the general timestamps option is off.
- Several formats at once: select the formats you need for a ZIP download. Include the recording file only when you also need the audio or video.
We downloaded the PDF through this window and checked that its text contained both speakers and the saved edit. Always open your own downloaded file before sending it, especially after making corrections.
Step 7: Find your recording again
Your recording remains in your library after downloading. Open All Recordings to find it, use search and filters when the library grows, and rename the title if you want something more descriptive. New Transcription shows up to 10 recent recordings, not the entire library.
If you need different transcription settings later, choose Transcribe again… from the recording’s three-dot menu. Review the options before launching: opening the window does not start a run. The current transcript stays until the new run succeeds. A rerun can replace your reviewed text, so download an important edited copy first.
What to try after your first transcript
- For difficult names and jargon, try Key terms on an eligible paid plan.
- For support and sales calls, Agent / customer roles can label the two sides of the conversation.
- For a meeting follow-up, explore AI insights when the recording and your account have access.
- For collaboration, use an authorised workspace instead of creating public links to sensitive material.
- For microphone capture, try Record Live on your next short session after checking browser microphone permission.
Choose The Right Plan As You Grow
Compare Free Unlimited, Pro Unlimited and Business Unlimited for longer files, advanced options and workspace work.
Compare PlansCommon first-run questions
- The file is listed but nothing is happening: confirm you selected Start Transcription, not just Choose files.
- The option you want is locked: some advanced settings need an eligible paid plan; basic transcription is still available on Free Unlimited.
- The wrong language was detected: choose the known spoken language before your next run.
- You cannot tell who spoke: keep Speaker labels on and review the labels against the audio. Overlapping voices can still need correction.
- The PDF has no times: Include timestamps is off by default. Turn it on in the download window if you want them.
- You cannot see an older recording on New Transcription: use All Recordings for the full library.
About this guide
Checked on October 16, 2026 with the current TranscribeAny upload, transcript, editing and download screens. The example is fictional synthetic audio; the transcript, saved replacement and PDF described are actual test results. Screenshots are cropped to the relevant controls and contain no account details or workspace names. Product options and limits may change, so check the current app before starting.
Need Help With Your First File?
Tell us where you are stuck and what kind of recording you are using. Avoid sending sensitive recording content unless it is necessary and authorised.
Contact Support