
A growing transcript library is easier to use when you can find the right recordings, group related work and download several reviewed transcripts together. TranscribeAny combines folders, search, filters and selection-based actions with a download window that can produce multiple formats in one ZIP. This guide follows a real two-recording export from the signed-in library to the files inside the downloaded archive.
The bulk-export path: All Recordings → narrow the list → select recordings → Download → choose formats → Download ZIP → unzip and check the files. PDF is selected by default and Include timestamps starts off.
Find Your Next Batch
Open TranscribeAny, then choose All Recordings to find the recordings you want to organize or export. Sign in if prompted.
Open Your LibraryOur example: two fictional product updates
We used two existing 15-second practice recordings, product-sync-key-terms and product-sync-no-terms. Their dialogue describes an invented product update with fictional names; no real customer or patient information is involved. Both were Ready in the library. We selected them together, chose PDF and plain text with timestamps off, and downloaded transcripts-2-recordings.zip.
The actual archive contained four files: one PDF and one TXT for each recording, grouped into two recording-named folders. We opened both text files and checked both one-page PDFs. The screenshots show the real controls and exported result, cropped to exclude the sidebar, account information, unrelated recordings and private folder names. They illustrate management and export, not a claim that the sample transcript spellings are all correct.
Step 1: Open the full library and narrow the list
The New Transcription page shows up to 10 recent recordings; use All Recordings for the full library. Choose the Recordings tab for selection-based actions. The History tab is useful for reviewing previous work and changes, but it is not the bulk-download selection list.
- Use Search… to find a recording title or creation date. In our example, product-sync narrowed the list to the two practice recordings.
- Choose a status such as Ready when you only want finished transcripts. Queued, Transcribing and Failed recordings are not eligible for the list’s transcript download action.
- Use the date-range control to narrow a period. Open More filters for criteria such as source, audio or video, language, sharing, who made the recording and transcription settings.
- If you use folders, open the relevant folder chip first. Browse all folders offers a searchable picker when there are more folders than fit in the chip row.
- Check the remaining titles before selecting anything. A narrow list is safer than a broad selection, especially before moving, sharing or deleting work.

Search in the Recordings list matches titles and displayed creation dates, not every spoken word. Use the History search when you need to search transcript text and review recording histories. Clear a search or filter when a recording seems to be missing rather than assuming it has been deleted.
Step 2: Select only the recordings you need
Tick the checkbox beside each recording, or use Select all after narrowing the list. Select all applies to the current filtered list, not every recording across every folder and account. Large lists may reveal more rows as you scroll, so check the action count rather than counting only the rows currently on your screen.

- Download uses the completed recordings in the selection. If you select Ready and unfinished rows together, its count can be smaller than the selection count.
- Rename and other personal-management controls depend on which recordings you own. Reading a teammate’s recording is not permission to rename it.
- Team choices appear only when you belong to a workspace. New users without a workspace do not see Myself (private) or workspace destination choices when starting recordings; their recordings stay private automatically.
- On a phone, the batch-action rail scrolls horizontally. Swipe the rail to reveal another action without changing the selection.
Optional: Organize before exporting
Use New Folder to create a group for a project, interview series or month. Select your recordings and use Move to choose a folder. Remove from folder removes that grouping; it is not the same as deleting a recording. Deleting a folder also leaves its recordings in the library, subject to any sharing restrictions shown in the confirmation.
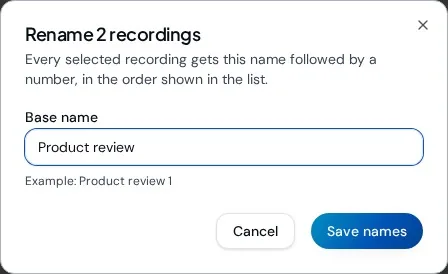
Rename opens a title editor for your selected recordings. With several recordings, the window offers a Base name and shows how numbering will look in list order. Clear titles make the list and exported filenames easier to understand. Preview the example before saving; Cancel leaves titles unchanged. A name already used by another of your own recordings can be rejected.
Share and Team are separate from moving between personal folders. Sharing into a workspace changes who can access the recordings, not merely their organization. Your private folder name stays visible only to you; teammates see a generic folder label. Workspace-filed recordings stay in that workspace, and owner rules can restrict taking shared recordings out or deleting them.
Step 3: Open Download and choose formats
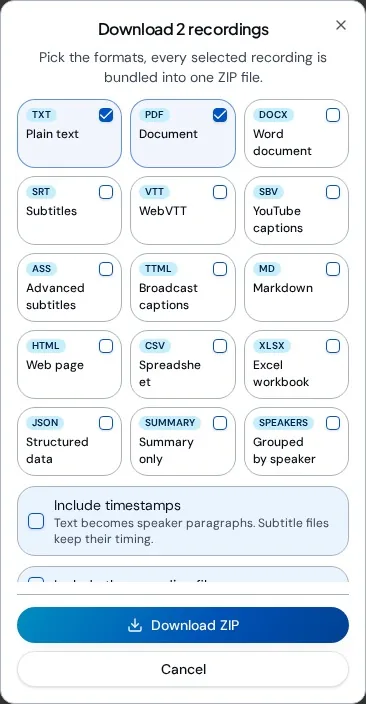
Select Download 2 for the two Ready recordings. The window is titled Download 2 recordings and explains that the selection will be bundled into one ZIP. PDF starts selected. In our test we also ticked TXT, so each recording produced a reading copy and a plain-text copy.
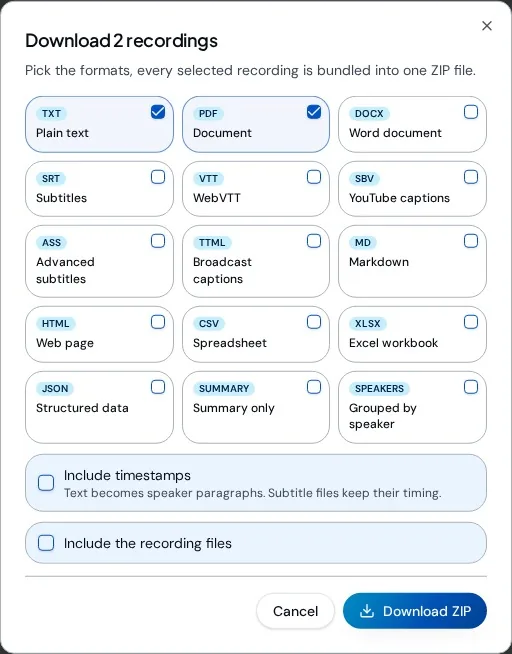
- PDF and Word: readable documents for review, meeting records and handover.
- TXT and Markdown: lightweight text for notes, drafting or another editing tool.
- SRT, VTT, SBV, ASS and TTML: timed caption formats; choose the format supported by the destination video or caption tool.
- CSV, Excel and JSON: structured exports for spreadsheets or further processing.
- HTML: a web-page file. Downloading it does not publish a public transcript link.
- Grouped by speaker: text arranged around speakers rather than a standard chronological reading layout.
- Summary only: a PDF of available saved summary material. Selecting this export does not generate new AI insights.
The window offers 15 export choices, including summary-only and speaker-grouped variants. These export choices are available across plans; paid transcription and AI features have their own eligibility rules. Do not select every format automatically; choose the copies that your next tool or reader actually needs.
Choose The Plan That Fits Your Work
All plans include the export choices. Compare recording limits, AI tools and shared workspaces separately from downloading your finished transcripts.
Compare PlansStep 4: Set timestamps and recording-file options
Leave Include timestamps off for flowing speaker paragraphs in reading exports. Turn it on when readers need time references for checking the source. Subtitle files always keep their timing, even when this checkbox is off, because captions need start and end times. The transcript’s on-screen timestamp preference and the download checkbox are separate settings.
Include the recording files is optional. Transcript copies are packaged into the ZIP, but recording files download separately rather than being loaded into that archive. They can be much larger than transcripts. Leave this option off when you only need documents, and check browser download permissions if you request several media files.
Step 5: Download ZIP and check its contents
- Select Download ZIP and wait for the archive to finish preparing. Keep the page open until the browser has saved the download.
- Locate transcripts-2-recordings.zip in your browser’s downloads or your device’s Downloads folder. On a phone, use the browser’s download list and Files app as appropriate.
- Unzip the archive. A multi-recording export puts each recording’s formats in its own named folder.
- Open at least one file for each recording and confirm the title, transcript content and timestamp choice. Check every expected format when handing the batch to someone else.
- Read any failure or skipped-file message. The archive name describes the selected recording count, not a guarantee that every requested file was successfully included.
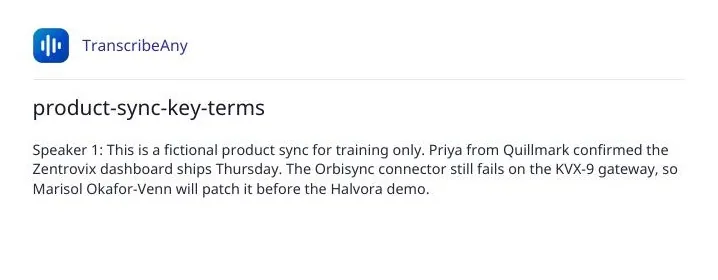
Our ZIP contained: product-sync-key-terms/product-sync-key-terms.pdf; product-sync-key-terms/product-sync-key-terms.txt; product-sync-no-terms/product-sync-no-terms.pdf; product-sync-no-terms/product-sync-no-terms.txt. Both PDFs had one page, and both text copies contained speaker paragraphs without line timestamps.
One recording in one format downloads directly. Several recordings, or several formats of one recording, produce a ZIP. A single-recording multi-format ZIP keeps its files at the top level; a multi-recording ZIP groups them into recording folders. Export names are cleaned for file compatibility and made unique when titles would otherwise collide.
What bulk export does not include automatically
- A library ZIP is not a complete account backup. It contains the export formats you selected, not workspace members, permissions, every activity event or all account settings.
- The ordinary list download exports the original transcript. To export a translated version, open that translation and use its download action; it uses the translated content shown there.
- Audio and video are not inside the transcript ZIP. Request recording files separately when needed.
- An export does not correct a transcript or approve AI output. Review names, numbers and important statements against the audio first.
- Files already downloaded cannot be recalled by stopping sharing or removing a workspace member. Store and send them carefully.
Troubleshooting missing or incomplete downloads
- Download is unavailable: select at least one Ready recording. If the run is still queued or transcribing, wait for completion; if it failed, inspect its error before retrying.
- The count is smaller than expected: only completed recordings in your selection are eligible for the list’s transcript download. Check filters and the action count.
- A ZIP is missing a requested file: read the error notice. A transcript that could not load, has no text or failed in one format can be skipped while successful exports remain in the archive.
- Summary only is empty or incomplete: check that the recording has saved AI summary material. This format exports existing information rather than generating it.
- The batch is taking longer: long transcripts, several document formats and larger selections require more preparation. Start with a smaller batch if your device is struggling.
- The browser did not save the file: check its Downloads list and download permissions. In an embedded preview, a Save file prompt may require a separate click.
- A management action is blocked: check recording ownership and workspace rules. Permission to read and export a shared transcript is not permission to rename, delete or move it out.
A repeatable routine for a tidy library
- Name recordings clearly as soon as you review them, and group related work into folders.
- Before each batch, narrow by folder, date and Ready status, then confirm the selection count.
- Choose only the needed formats and set timestamps intentionally.
- Unzip, open the files and compare the expected recording and format counts before sharing the batch.
- Use History to revisit recent changes. Keep reviewed exports in secure storage and delete source recordings only when retention and workspace rules allow it.
Need Help With A Bulk Export?
Tell support which formats you chose, how many recordings you selected and what message appeared. Avoid attaching sensitive recordings unless requested through an appropriate channel.
Contact Support