
Clinical recordings contain words that everyday speech recognition can struggle with: medication names, anatomical terms, abbreviations and rapidly spoken measurements. TranscribeAny’s Medical transcription setting uses a clinical speech-recognition model to produce an editable draft. The useful workflow is not simply upload and copy: prepare the recording, choose the right settings, listen back, correct important details and only then export.
Medical transcription is a transcription aid, not medical advice, a diagnosis tool or a guarantee of clinical accuracy or healthcare compliance. A qualified reviewer must check the transcript before it is used in patient records. Every example and screenshot below uses fictional training audio, not a real patient.
What Medical transcription changes
Turning on Medical transcription selects a model fine-tuned for clinical audio rather than the standard model. Its focus includes drug names and clinical dictation. You still receive a transcript with playback, word timing, optional speaker labels, editing and downloads. It does not create a verified clinical note, infer a diagnosis, reconcile medications or connect to an electronic health record.
Clinical speech recognition is built to handle medical vocabulary better than the standard model, but no setting makes transcription an accuracy promise. Isolated medication names without sentence context remain particularly difficult. Do not assume every language or specialty performs equally well, or treat general language support as clinical validation.
Which plan and workflow do you need?
- Medical transcription is available on Pro Unlimited and Business Unlimited, not Free Unlimited.
- Use file upload for this walkthrough. Medical mode is not part of live browser recording. If you dictated using a voice recorder, save the file first and upload it.
- Paid plans accept recordings up to 10 hours and files up to 5 GB each. The medical toggle does not increase your usual limits.
- For eligible Business work, choose the workspace before starting. Anything filed there enters its shared library. Sharing a private recording afterwards does not give it workspace-plan benefits.
Choose A Plan With Medical Transcription
Compare Pro Unlimited for individual work and Business Unlimited for shared workspace work. Medical transcription requires an eligible paid plan.
Compare Medical-Ready PlansBefore uploading: permission, privacy and clear audio
Use only recordings you have the right and permission to process, with a lawful basis for any health information they contain. Confirm your organisation’s recording, consent, retention and security requirements first. Start with fictional or properly de-identified training material when evaluating the workflow.
- Keep the original recording in your approved storage location. Speak clearly, pause between thoughts and state medication names in meaningful sentences rather than isolated fragments.
- Choose Myself (private) if no teammate should access the recording. Choose a workspace only when its members are authorised to see the content.
- Avoid public sharing links for sensitive material: a read-only transcript link can still disclose health information to anyone who receives it.
- Do not assume Business Unlimited supplies a healthcare agreement or compliance certification. Eligibility for such agreements depends on specific contracts and retention settings that TranscribeAny has not established.
Healthcare-grade handling only ever exists under specific enterprise agreements and retention settings, which TranscribeAny has not established. Do not upload protected health information if your organisation requires agreements or controls that have not been confirmed for this service.
Step 1 — Choose the destination and spoken language
Sign in and open the upload panel on your home page. Under Transcribe this for, choose Myself (private) or the authorised workspace. Select the language actually spoken in the file. For our fictional English dictation we chose English rather than asking the app to detect a short recording.

Audio cleanup can reduce rumble, soften hiss and balance volume locally before upload. It adds preparation time and makes the cleaned track the stored playback audio; the original on your device is unchanged. It cannot recover missing or distorted speech. We left it off for this clear training sample.
Step 2 — Enable Medical transcription and add relevant terms
Expand Transcription options below the language controls, then switch on Medical transcription. Add a short comma-separated list of relevant Key terms if needed. For this example we entered metformin, hypertension. These terms guide recognition; they do not force a correct answer or prove that the speaker said them.

- Speaker labels: keep them on if identifying turns helps review. Automatic labels are not verified clinician or patient identities. Agent / customer roles are for support calls, not clinical identity verification.
- Remove filler words: switch off when you need a closer verbatim draft. Leaving it on can improve readability, but important wording still needs review against the audio.
- Redact personal data: optional text masking is not complete de-identification and does not remove identifiers from the source audio. Review both the transcript and any export.
- Multi-channel audio: use only when speakers were recorded on separate channels. The app supports up to five channels and does not combine this setting with text redaction.
- Presets: save selected settings for repeat use. Check both your preset and destination for every new recording.
Step 3 — Choose a file and start transcription
Select Choose files and add the recording, or drag it into the upload area. Check its filename in the queue, confirm the destination, language and Medical transcription setting, then select Start Transcription. Keep the page open until preparation and upload finish. Once the recording is queued for processing, you can leave and return later.
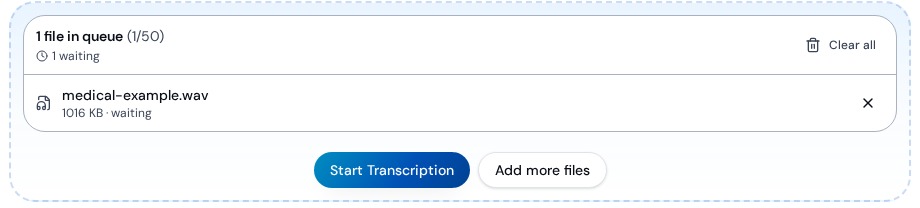
A fictional example: what was said and what came back
We created a 23-second synthetic training dictation and ran it through the real upload workflow with English, Medical transcription and the two key terms enabled. It contains no patient name, identifier or treatment instruction. Its spoken text was:
“This is a fictional training dictation, not a real patient record. The example discusses metformin and hypertension. The speaker says: no chest pain. Medication names, numbers, and negative findings must be checked against the audio. This example is for transcription practice only and is not medical advice.”
The resulting draft retained metformin, hypertension and the negative phrase ‘No chest pain.’ It added punctuation and split the text into timed segments. This demonstrates one short, clear example—not clinical performance on real encounters, noisy audio or unfamiliar terminology.
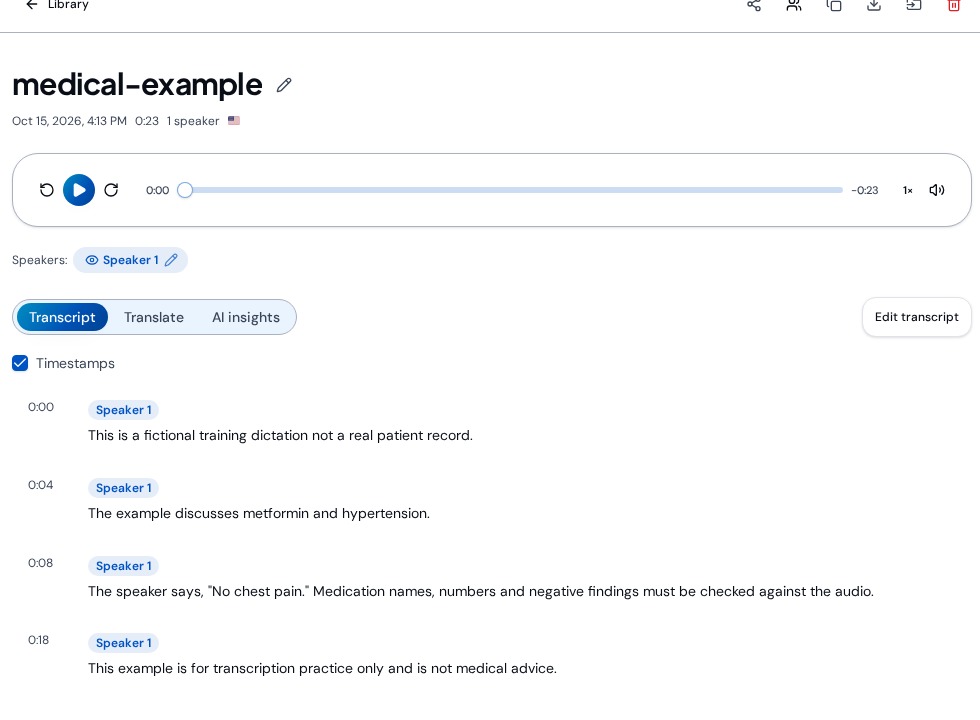
Step 4 — Review clinical details against playback
Open the finished recording. Click a sentence to jump to its audio, replay it and use a slower speed when necessary. Keep Timestamps visible for source references, or hide them for flowing paragraphs. Select Edit transcript to correct wording, review replacements and save. Saved text, title and speaker changes appear in recording history.
- Check medication names letter by letter. Similar-sounding names can change the meaning even when the sentence reads naturally.
- Check each number, unit, decimal, route and frequency actually spoken. Do not fill gaps based on clinical expectation.
- Check negatives and uncertainty: no, not, denies, possible and suspected must not be silently dropped or strengthened.
- Check who said each statement. Rename speakers only after listening; a generated label is not proof of identity.
- Mark unresolved wording for clarification rather than inventing a plausible correction. Obtain qualified review before copying anything into a patient record.
For our example, make sure ‘no chest pain’ has not become ‘chest pain’. The transcript reports the fictional speaker’s words; it does not establish a medical finding. A polished-looking draft can still be wrong, so the recording remains the source of truth.
Step 5 — Download the reviewed draft
Select the download icon on the recording page. PDF is selected by default and Include timestamps starts off. Choose Word for further document editing or PDF for a reading copy. Keep timestamps on when reviewers need audio references. Selecting multiple formats produces a ZIP. Summary-only output requires existing AI insights and is not a substitute for the full transcript.
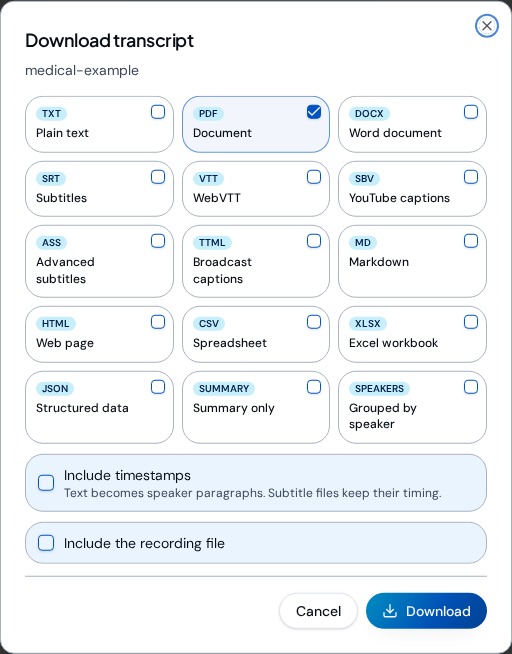
Open and review the exported file before distributing it. Store it only in an approved location and share it only with authorised recipients. Subtitle formats always retain timing. An export is a separate local copy: deleting a recording later does not remove files you or others already downloaded.
Retries, translation and AI summaries are separate steps
If you created the recording and its audio is still available, choose Transcribe again… from the three-dot menu to review a new language or option setup before starting. The old transcript survives a failed attempt; a successful new run replaces it and clears older insights and translations. Download anything you need to keep before starting again.
Translation and AI insights are separate features, not medical-model diagnosis or clinical validation. Translation adds another opportunity for wording errors and is controlled by the recording’s creator; teammates cannot translate someone else’s recording. Authorised workspace members can use initial insights and Q&A on workspace-filed work, while regeneration is owner-controlled. Check every AI summary against the reviewed transcript and source audio; never treat an inferred diagnosis or action as something the speaker established.
If the option or result is not what you expected
- Medical toggle unavailable: confirm an eligible paid plan or authorised Business workspace destination, and use file upload rather than live recording.
- Drug names misheard: supply relevant key terms, use sentence context and listen back. Key terms cannot repair absent audio.
- Speakers split incorrectly: review labels and the speaker-count hint, then consider transcribing again. Do not use call-centre role labels to infer clinical identities.
- No speech or poor text: check that the file contains audible speech in the selected language. Cleanup cannot reconstruct words never captured clearly.
- Sensitive data concerns: confirm your organisation’s requirements before uploading. Masking, private storage and a Business plan are not themselves compliance guarantees.
Try A Fictional Training Example
Already have Pro Unlimited or Business Unlimited? Open the upload panel, select Medical transcription and start with non-patient practice audio.
Open The Upload PanelAbout this guide
Checked on October 15, 2026 against TranscribeAny’s actual settings. Screenshots show a completed fictional upload; account details and unrelated workspaces are excluded. Product behaviour can change with updates, so confirm the current settings in the app.
Need Help With A Medical Upload?
Tell us the file type, selected settings and error message. Do not include patient information, passwords or payment details in your support message.
Contact Support